Sunday, December 13, 2009

Christmas papers as a gift to you!

Believe it or not, I actually was able to be creative today and decided to share some of my designs with you. They are two Christmas papers sized at 12x12 300 dpi.


Download here

Friday, October 9, 2009

Coupon Code for Missy's Bits Designs


I'm on Missy's creative team and she's asked that I share this coupon with you! Have fun shopping!

Saturday, July 11, 2009

A Mother's Flower template

Wow! It's been a couple of months since I've posted but I had fallen four weeks ago so I've not been doing a lot of scrapping or designing.


A few months ago, I tried entering a contest to become a designer for a store. I didn't win and wanted to share this template (.PNG) with you! Enjoy!


Monday, May 25, 2009

What a busy month!

Sorry, I don't have any freebies yet this month. It's been busy with two camping trips, Mother's Day, my birthday and work. Look for something in the few weeks.

Tuesday, April 21, 2009

YEAH!!! I'm on a creative team

I was offered a position on the creative team for Missy's Bits Designs! I'm so excited I had a hard time sleeping last night. :) You can find her designs at:

Designs In Digital
Just Digi Layouts

I'll be working with her designs, creating layouts for galleries and participating in challenges.

Thursday, April 16, 2009

Torn Alphabet

Here's an alphabet freebie from me. I love how this looks like you had three separate layers of paper and torn them. I actually did this years ago in my paper scrapbook. Enjoy!


Friday, April 10, 2009

Tip for distorting items into a curve

Have you tried to bend text using the Arc feature when you're editing the text? Sometimes it gives me the look I want but most of the time it doesn't. I was creating a metal charm embellishment today and wanted it to curve. The Liquify filter distorted my image so I played around with the Distort->Shear filter. Voila'!


Here's how it works. First, your item needs to be completely vertical. Then selection Filter, Distort, and then Shear. You'll get a popup window with a little graph where you can drag the middle handle (square thingy) to the right and different vertical positions to bend your item. If you're doing this with text, you'll need to Simplify the layer first. When you're done, you can simply rotate it by 90 degrees and place it on your layout. The beauty of this method is that you get a nice consistent curve without distortion!


Example:

Monday, March 9, 2009

Do you like freebies?

Here's another freebie for you. I know that Spring weddings are coming up so I wanted to share these circles I created. The circles of text are:

  • Love is in the Air
  • Wedding Bells
  • Friends Forever


Saturday, February 28, 2009

More beads anyone?

Well, here's another set of beads. I was having a lot of fun just playing around with various layer styles. The three beads on the left were created using the Scrapper's Guide Glitter layer style. The fifth bead from the left coordinates with my Spring Kit below.

Download them here and enjoy! Let me know what you think. Leave a comment to share how you used the beads!

I got a blog award!

MemoryKeeper from EasyCustomBlogs passed on the Totally Awesome Blog award. It was a nice surprise. When we receive this award, we're supposed to pass it on. I nominate:


Nicole Young Designs
Tina Chambers
Purely Pixels

Sunday, February 22, 2009

Beads galore!

Ok, I had the creative juices flowing this morning. Well, maybe I was having too much fun? Is that possible? Here is a set of beads for your layouts. Let me know what you think. Want different colors? Different shapes?


Saturday, February 21, 2009

Give me suggestions for freebies!

I've got some freebies in mind that I'm working on but wondered if there are things you're specifically looking for. Templates? If so, how many photos? Alphas? Ribbons? Tags? Shiny things? Let me know!

Saturday, February 14, 2009

Here's an alpha freebie for you!

I wanted to share another freebie I created. I call it Metallic Blue Wave and it has Uppercase, numbers, and symbols. The file is a .PNG so you can simply use a marquee tool to select out the letter, number, or symbol you want to use in your layout.
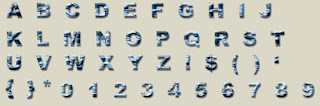


Download it here.

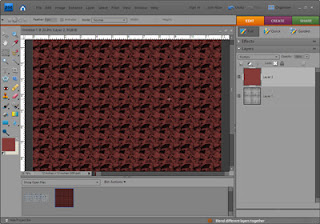
Would you like to know how I created this? Well, first, I'm using Adobe Photoshop Elements 7.0. This also works in Photoshop Elements 4. After creating a new document at 300 dpi, I did the following:

1. I did a Fill Layer and selected the metallic-looking pattern which is actually called Satin.
2. Since the design too close together, I used the transform tool to increase the size about 200%.
3. I then added a new layer on top and filled with a solid color. Choose any color that pleases you! I clicked on the solid color layer and then changed the blend mode to Multiply. Color Burn looks good too.


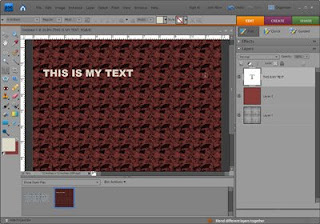
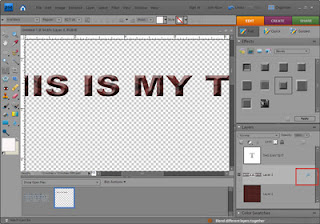
4. Now, you'll create a new layer and type in the text that you want to have this design. I suggest you choose a big, chunky font.


5. Next, you need to merge the bottom two layers. Click on one layer and then SHIFT + click on the second layer and press CTL + E to merge the layers into one.


6. Now, you CTL + click on the thumbnail of the text layer to put a selection around the letters.

7. Click on the layer below and press CTL + J to make a new layer from the selection you made. Hide the original letter and background layers and you'll see your text with the new design appear.


8. Now, you can add what layer styles you want. I choose Simple Sharp Inner bevel. This comes out a little too "pointy" for me so you can modify the layer style and change the bevel to be smaller. You can do this by clicking on the fX icon on the right-side of the layer in the layer palette.


You're done! Now, you can copy the text to your layout! Let me know if you have questions.

Sunday, February 8, 2009

My first freebie!!


Hey, while I am recuperating from back surgery, I decided to make a digital scrapbooking kit. Since we had some warmer temps this weekend, I decided to focus on spring. You can download my freebie, Spring Kit, here.


Please remember to review my terms of use, which are included in the zip file. Since I design 12x12 and 300 DPI, the download file is fairly large. It's about 65Mb. I've made a single file for the buttons, one for the ribbons, etc. vs. making an individual PNG file for each individual button. Let me know if this doesn't work for your program.

Here's a layout my best friend, Michele, made with my kit. It sure put a smile on my face!


Friday, February 6, 2009

Making Progress

Well, I learned how to get my background image to show on my blog. I uploaded my images to MediaFire but when I grabbed my link to the image, I was viewing a smaller version which explained why it wasn't taking up the entire page width. So I had to go to the "large" view within MediaFire and got the correctly sized image. Whew!

Monday, February 2, 2009

Still creating graphics

I'm in the process of creating the graphics I want to use for my blog. I'm using information from Nicole Young to help me along the way. Also check out the Easy Custom Blogs site.

Sunday, February 1, 2009

Welcome to my blog!

I've been toying around with blogging for awhile lately and wanted a place to share things that I've learned during my adventures in digital scrapbooking. I'd plan on posting things like:
  1. Tutorials
  2. Templates
  3. Papers and embellishments I've designed

I currently use Adobe Photoshop Elements 4.0 but will be soon upgrading to 7.0 once I figure out why my computer randomly locks ups. :(

My Layouts from Slide.com